Are you an aspiring Amazon seller looking to maximize your sales and achieve success? Well, you’re in luck. Allow me to introduce you to SellerSprite’s remarkable product research tool that helps you uncover sales trends, refine your product research strategy, and master the art of selecting winning products using this powerful tool.
In this blog post, I’ll walk you through the process of how to optimize your product research with SellerSprite. By the end of this guide, you’ll be equipped with the knowledge and insights needed to excel in the competitive world of Amazon selling.
If you’ve just landed on my blog for the first time, my name is Ian Smith, and I run an Amazon Marketing Agency called Evolve Media Agency.
What We Do at Evolve Media?
We help Amazon sellers optimize their Amazon listings with photos, videos, and copy to get their listings converting as high as possible through product photoshoots, video shoots, on and off Amazon marketing, Email Marketing, and Google Ad campaign management.
To book a free strategy and consulting call with us, visit EMAamz.com. If you’re a DIY Amazon seller and want to optimize your Amazon listing on your own, we’ve got a powerful Amazon listing checklist for you at EMAamzchecklist.com.
We broke down all of the different sections of an Amazon detail page and created different sales strategies for each area of a listing. You can check these items off as you and your team implement the different sales strategies. Now, let’s get to the good stuff!
How to Optimize Your Product Research with Seller Sprite?

Let me walk you through the product research process using the SellerSprite platform. The following is a detailed, step-by-step approach to optimize your product research with SellerSprite.
Step 1: Accessing Seller Sprite
To begin your product research journey with Seller Sprite, start by logging in to your SellerSprite account. If you don’t have an account yet, you can easily create one and sign up here.
As a bonus, make sure to use the promo code “evolve68” during sign-up and get $30 OFF in SellerSprite’s standard plan per month.
Step 2: Navigating to the Product Research Tool

Once you’re logged in, you’ll find yourself on the Seller Sprite dashboard. Look for the “Tools” section at the page’s top.
From the dropdown menu within the “Opportunity Finders” category, select “Product Research.” This will take you to the dedicated product research tool within SellerSprite.
Step 3: Establishing Your Objectives and Criteria
Before diving into the vast world of product research, it’s crucial to establish clear objectives and criteria for your business. Take some time to define your specific goals, such as the type of products you’re interested in, the target niche or market segment you want to focus on, your budget allocation for sourcing and advertising, and the desired profit margin you aim to achieve.
Step 4: Setting Filters

Within the product research tool, you’ll find product categories on the left side. Choose the category that aligns with your business or niche, for example, “Home and Kitchen.”
On the right side, you’ll find advanced filters to refine your search based on specific criteria. You can set filters such as the number of units sold, expected monthly revenue, number of customer reviews, and FBA fulfillment type.
Step 5: Conducting Your Search
Once you’ve set your criteria and filters, click the “Search Now” button to initiate the search. The tool will generate a list of products that match your parameters.
Step 6: Refining Your Search
If you need to narrow down your results further, you can refine your search by selecting additional filters or adjusting your criteria. For example, you can filter products launched within the last year to focus on newer opportunities.
Step 7: Exploring Product Details

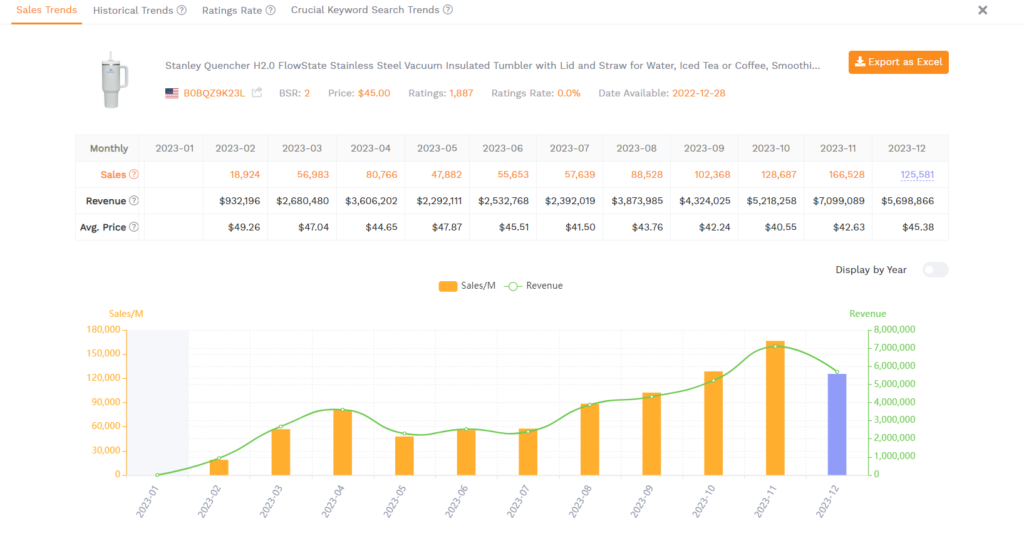
SellerSprite provides detailed information about each product, including ASIN, BSR, growth rate, monthly sales trends, units sold, gross margin percentage, ratings, launch date, and more.
You also get additional features like reverse ASIN search, ad insights, and a profit margin calculator. You can explore these features to help you make informed decisions about which products to pursue.
This data helps you quickly evaluate each product’s potential.
Step 8: Comparison and Tracking
With SellerSprite’s intuitive interface, you can easily compare multiple products side by side. This allows you to analyze key metrics such as sales volume, revenue, reviews, ratings, and more. Visually comparing the data makes it easy to identify trends, patterns, and potential opportunities in the market.
Take Your Product Research to the Next Level
SellerSprite’s product research tool is an invaluable asset. The steps outlined above will help you make informed decisions, discover profitable opportunities, optimize your product listings, and ultimately become a highly profitable seller on Amazon with SellerSprite.
Remember that product research is an ongoing process. It is important to realize that continuously reviewing and refining your research is essential to stay ahead of the competition, adapt to market changes, and maximize your business’s potential.
Before signing up for SellerSprite, take advantage of a special offer using the promo code “evolve68.“ You can get $30 OFF in SellerSprite’s standard plan per month, making it an even more cost-effective solution for your product research needs.


